
Attributes #
Attributes allow you to offer additional product options that customers can select before placing an order. Common examples include material, finish, paper type, packaging, or other custom options that affect pricing or inventory.
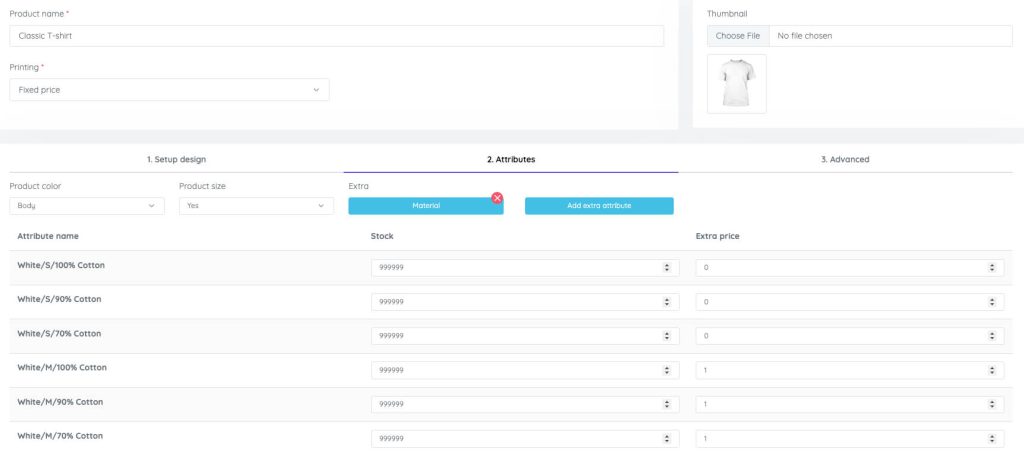
In Product Designer App, attributes are configured within the Product Base. After creating an attribute group and its values, the system automatically generates all available options, allowing you to manage stock quantities and additional pricing for each attribute.
This guide explains how to create, edit, and manage product attributes.
When to Use Attributes #
Use attributes whenever a product offers optional selections that are independent of the design itself.
Common examples include:
- Material
- Paper Type
- Finish
- Packaging
- Frame Type
- Handle Style
- Fabric Type
- Gift Box
- Premium Coating
Unlike colors or sizes, attributes are typically used for optional product variations that may affect production cost or inventory.
Before You Begin #
Before configuring attributes, make sure you have already completed the Design setup for your Product Base.
Typical workflow:
Create Product Base
        ↓
Configure Design
        ↓
Configure Attributes
        ↓
Configure Pricing
        ↓
Connect to WooCommerce
Open the Attributes Tab #
Navigate to:
WordPress Admin → Product Designer App → Product Bases
Create a new Product Base or edit an existing one.
After completing the Design tab, switch to the Attributes tab.
This is where all custom product attributes are managed.
Add a New Attribute #
Click Add Extra Attribute.
A new attribute group will be created.
For each attribute, enter:
- Attribute Name
- Attribute Values
For example:
Attribute Name
MaterialAttribute Values
Cotton
Polyester
Canvas
Another example:
Attribute Name
Paper TypeAttribute Values
Glossy
Matte
Premium Matte
Each value represents one selectable option that customers can choose.

Save the Attribute #
After entering the attribute information, click Save.
Product Designer App automatically generates the complete list of available attribute values.
You no longer need to create each option manually.
The generated list can then be used for pricing and inventory management.
Manage Extra Price #
Each attribute value can have its own additional cost.
This allows premium options to increase the final product price automatically.
Example:
| Attribute | Extra Price |
|---|---|
| Cotton | $0 |
| Polyester | $3 |
| Canvas | $8 |
If the customer selects Canvas, the additional cost is added to the product price during checkout.
Extra pricing can be used for:
- Premium materials
- Luxury finishes
- Special packaging
- Optional accessories
- Additional production costs
Leave the extra price at 0 if an option should not affect the product price.
Manage Stock #
Each generated attribute value also supports inventory management.
You can specify the available stock quantity for every option.
Example:
| Attribute | Stock |
|---|---|
| Cotton | 120 |
| Polyester | 80 |
| Canvas | 25 |
This allows Product Designer App to track availability for individual attribute options.
If an option reaches zero stock, it can no longer be selected (depending on your inventory configuration).
Stock management is especially useful for products with limited materials or optional accessories.
Edit an Attribute #
To modify an existing attribute:
- Open the Product Base.
- Go to the Attributes tab.
- Edit the attribute name or values.
- Save the changes.
If you add new values, the system automatically generates the corresponding attribute entries.
You can then configure stock quantities and additional pricing for the new options.
Delete an Attribute #
To remove an attribute:
- Open the Product Base.
- Navigate to the Attributes tab.
- Delete the attribute group.
- Save the Product Base.
Removing an attribute also removes its generated pricing and stock configuration.
If the Product Base is already being used by published products, review your configuration before deleting attributes.
Example Configuration #
Suppose you sell customizable canvas prints.
You create the following attribute:
Attribute Name:
Material
Values:
Canvas
Acrylic
Wood
After saving, Product Designer App generates:
| Material | Extra Price | Stock |
|---|---|---|
| Canvas | $0 | 100 |
| Acrylic | $20 | 40 |
| Wood | $35 | 15 |
Customers will see these options when configuring the product, and the selected option automatically affects pricing and availability.
Best Practices #
For the best experience:
- Use clear and descriptive attribute names.
- Keep attribute values short and easy to understand.
- Only create attributes that customers need to choose.
- Configure extra pricing immediately after creating new values.
- Keep stock quantities up to date.
- Test each attribute option before publishing the product.
Properly configured attributes make products more flexible while ensuring accurate pricing and inventory management throughout the ordering process.


